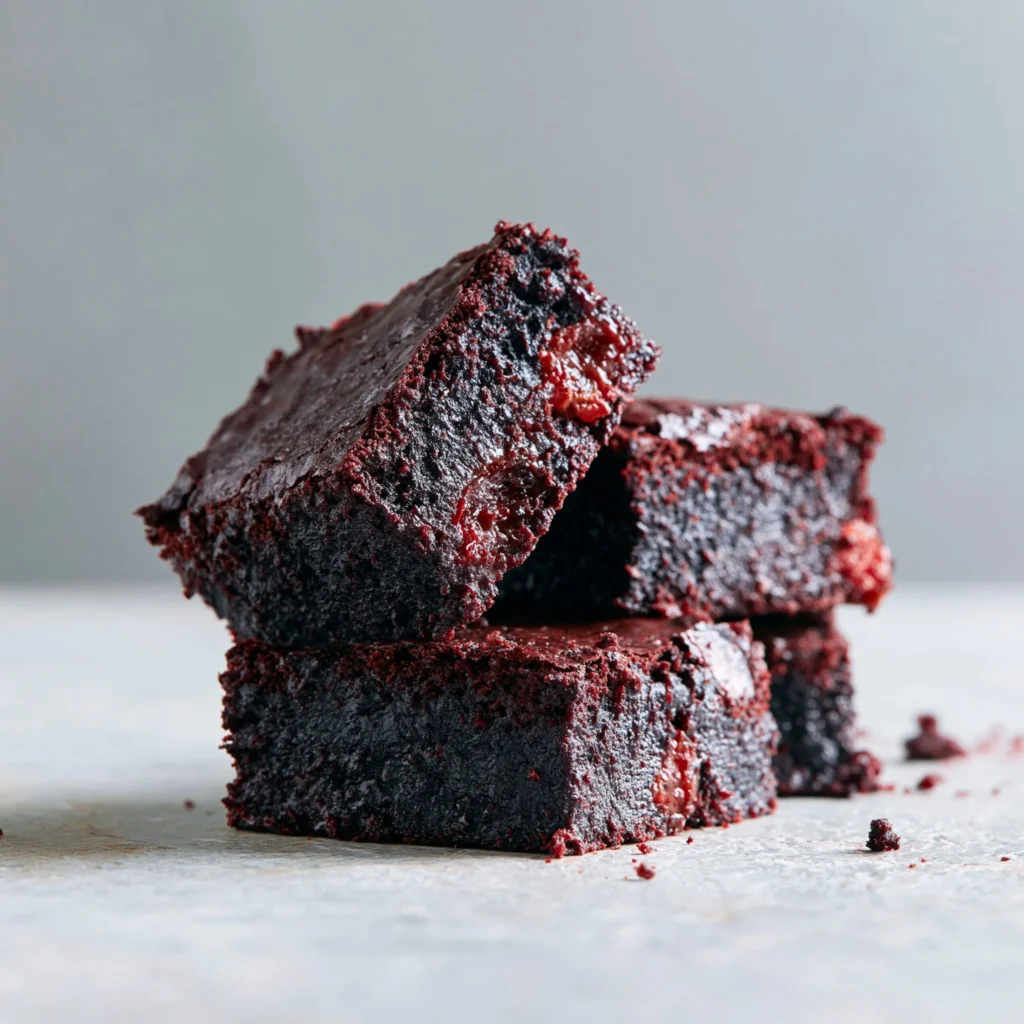
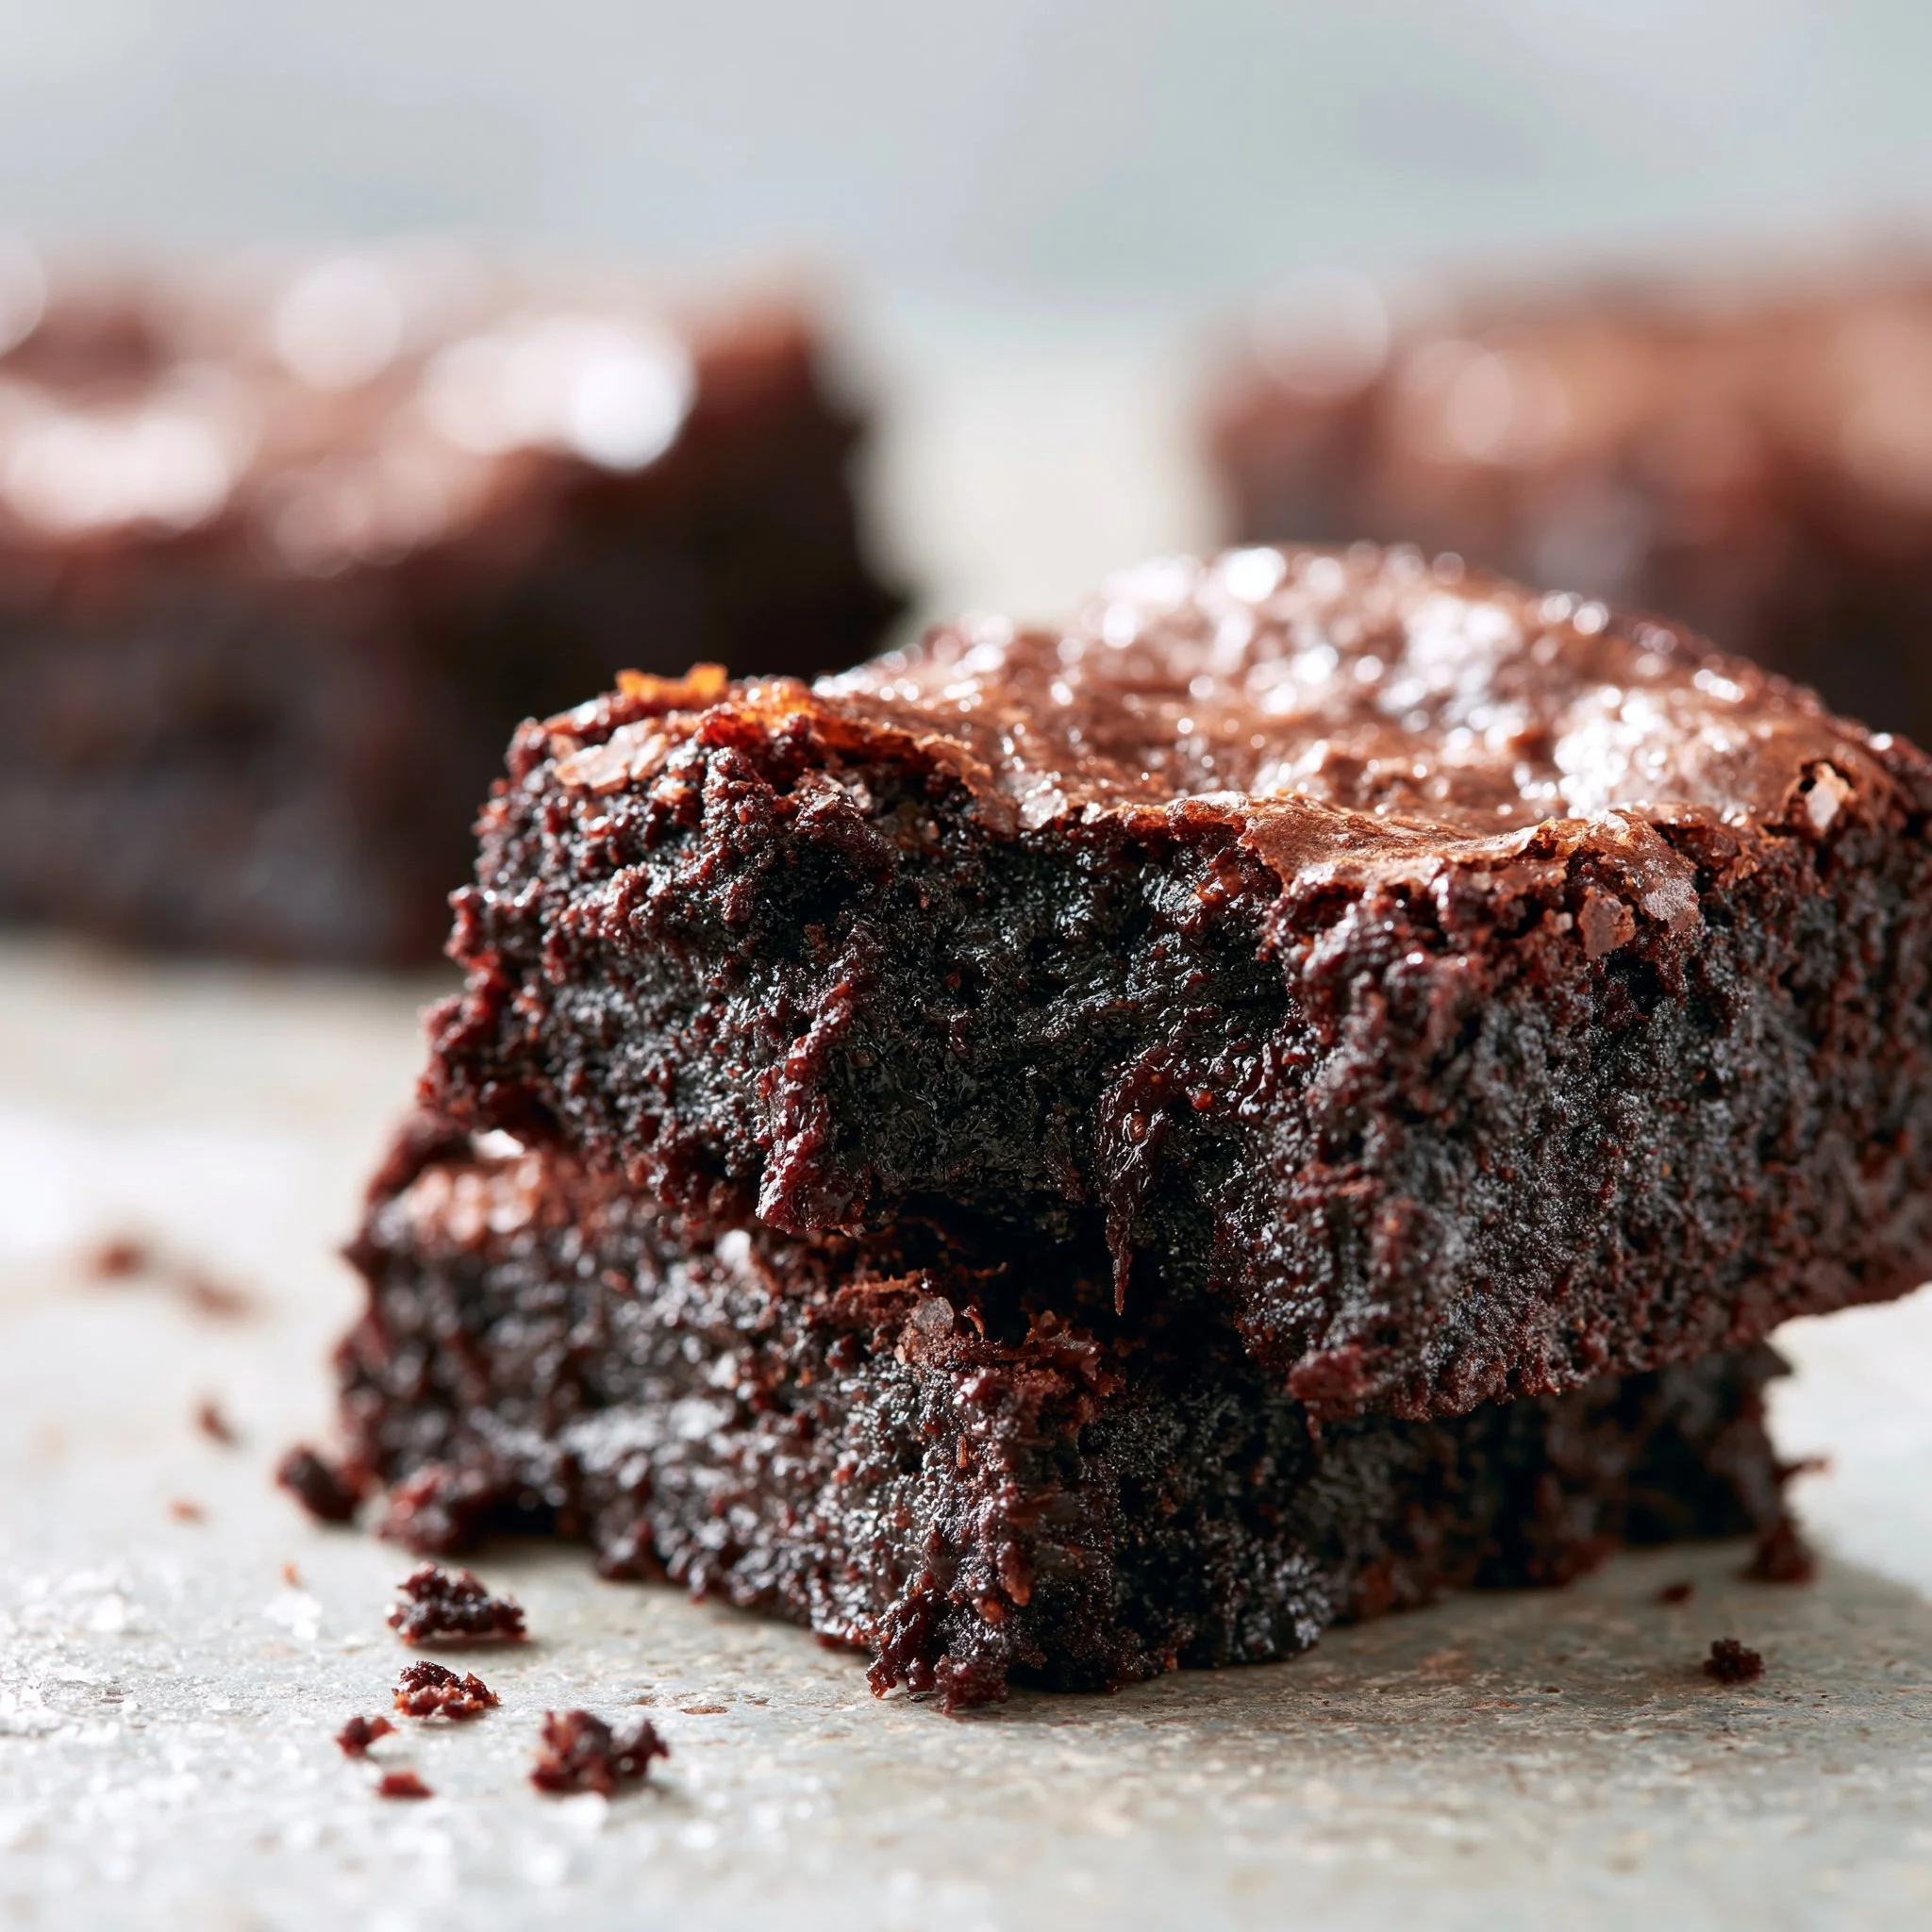
The first time I tested these fudgy date brownies, I was surprised by how brownie-like the batter looks—deep cocoa-brown, glossy, and thick—without any granulated sugar in sight. The Medjool dates melt into a caramel-dark sweetness that plays really well with bitter cocoa, and the coconut oil keeps the crumb dense and silky instead of cakey. If you like the center pieces of a brownie pan, you’re in the right place.
They come together quickly in a food processor, bake in about 20–25 minutes, and slice best once completely cool (that’s when the fudgy texture really sets). If you’re browsing for a dependable homemade brownie to keep on repeat, this fudgy date brownie recipe is the one I reach for when I want something deeply chocolatey but not overly sweet.
Why You’ll Love This Recipe
- The dates create a naturally sweet, caramel-y base that makes the cocoa taste even more intense (think dark chocolate vibes, not candy-sweet).
- The texture lands firmly in the fudgy zone: set edges, soft center, and a dense bite that slices into clean squares once cooled.
- A food processor does almost all the work—date paste, wet ingredients, and batter all in one flow.
- Coconut oil adds richness and a smooth finish without making the brownies greasy.
- Optional dark chocolate chips on top melt into little puddles and give you that classic brownie look with zero extra effort.
The Story Behind This Recipe
I developed these on a week when I wanted brownies but didn’t want to fuss with melting chocolate on the stove or dealing with a mixer—so I leaned on Medjool dates and a food processor for that thick, glossy batter feel. If you’ve made my easy brownies before, this version is the same kind of straightforward bake—just with dates doing the heavy lifting for sweetness and texture.
What It Tastes Like
These taste like dark, cocoa-forward brownies with a gentle caramel note from the dates and a warm vanilla background. When they’re baking, the kitchen smells like rich hot chocolate—deep cocoa, slightly fruity, and cozy. The edges bake up set and brownie-like, while the center stays soft and fudgy; add the chocolate chips and you’ll get little bittersweet pops on top that make each bite feel extra finished.
Ingredients You’ll Need
Medjool dates are the key here: they blend with hot water into a smooth paste that sweetens and thickens the batter. Unsweetened cocoa powder brings the bold chocolate flavor (use a fresh container for the best aroma), while coconut oil adds richness and helps the brownies set into that dense, fudgy texture. Eggs give structure so the squares hold together cleanly once cooled.
- 1 cup Medjool dates, pitted and packed
- 1/2 cup hot water
- 1/2 cup unsweetened cocoa powder
- 1/4 cup coconut oil, melted
- 2 large eggs
- 1 teaspoon vanilla extract
- 1/2 teaspoon baking powder
- 1/4 teaspoon salt
- 1/2 cup dark chocolate chips (optional, for topping)
How to Make Fudgy Date Brownies
- Prep the pan and oven. Heat the oven to 350°F (175°C). Line an 8×8-inch baking pan with parchment paper so you can lift the brownies out easily later (leave a bit of overhang on two sides).
- Make the date paste. In a food processor, blend the pitted Medjool dates with the hot water until the mixture looks like a thick, smooth paste. Scrape down the bowl once or twice—those sticky date bits love to cling to the sides.
- Add the wet ingredients. Pour in the melted coconut oil, then add the eggs and vanilla. Process until the mixture is evenly combined and glossy, with no streaks of egg.
- Whisk the dry ingredients. In a separate bowl, whisk together the cocoa powder, baking powder, and salt. This helps the cocoa distribute evenly so you don’t end up with bitter pockets.
- Finish the batter (don’t overmix). Add the dry mixture to the food processor and pulse just until you no longer see dry cocoa. The batter will be thick, dark, and spreadable—stop pulsing as soon as it comes together.
- Spread and top. Scrape the batter into the prepared pan and smooth it into an even layer. If using, sprinkle dark chocolate chips over the top (they’ll melt and look bakery-style).
- Bake. Bake for 20–25 minutes, until the edges are set and the center still looks slightly soft and fudgy. You’re not looking for a dry, fully firm middle here.
- Cool completely before slicing. Let the brownies cool fully in the pan. This is when they firm up into that dense, fudgy texture—slice too early and they’ll feel a bit too soft.
Tips for Best Results
- Use truly hot water when blending the dates—it softens them fast and helps you get a smoother paste (less grainy, more fudge-like).
- Stop pulsing as soon as the cocoa disappears. Over-processing can warm the batter too much and make it looser than it needs to be.
- Watch the edges, not the center, for doneness. When the perimeter looks set and slightly pulled from the parchment, you’re in the right zone for a fudgy middle.
- Cool all the way before cutting. A fully cooled pan gives you cleaner edges and a denser bite—think neat squares instead of spoonable brownies.
- For prettier slices, wipe the knife between cuts. The chocolatey, date-rich crumb is sticky in the best way.
Variations and Substitutions
- Skip the chocolate chips for a clean, glossy top—still deeply chocolatey, just a little less bittersweet on the finish.
- Keep the chips but use them lightly if you prefer the date-and-cocoa flavor to lead; a thinner sprinkle still gives you that classic brownie look.
- No food processor? This recipe is designed around blending dates into a smooth paste; without that, you’ll lose the signature fudgy texture.
How to Serve It
- I love these slightly chilled for the densest, fudgiest bite—almost truffle-like in the center.
- Serve at room temperature when you want the cocoa aroma to come through strongest.
- For a simple finish, slice into small squares and pile them on a plate so the melted chocolate chips on top show off.
- If you’re building a dessert board, these pair nicely with coffee or black tea—the cocoa and date caramel notes really pop.
How to Store It
Store the brownies in an airtight container once completely cooled. They hold up well at cool room temperature for a couple of days, or in the fridge for a longer stretch (they’ll get even fudgier as they chill). For longer storage, slice into squares first, then freeze; thaw in the fridge or on the counter until the center is soft again.

Final Thoughts
If you’re craving brownies that are dark, dense, and deeply cocoa-forward—with that subtle caramel sweetness only dates can give—this batch delivers without a lot of fuss. Let them cool fully, cut into tidy squares, and don’t be surprised if you find yourself sneaking an extra “just one more” from the container.
Conclusion
If you’d like to compare approaches to date-sweetened brownies, I also recommend checking out Healthy Little Vittles’ flourless date brownie version, Sweet As Honey’s take on date brownies, and Olives + Thyme’s dense, rich date brownie recipe—they’re great references for seeing how small method choices change the final fudgy texture.

Fudgy Date Brownies
Ingredients
Method
- Preheat the oven to 350°F (175°C). Line an 8×8-inch baking pan with parchment paper.
- In a food processor, blend the pitted Medjool dates with hot water until the mixture is a thick, smooth paste.
- Pour in the melted coconut oil, then add the eggs and vanilla. Process until evenly combined and glossy.
- In a separate bowl, whisk together the cocoa powder, baking powder, and salt.
- Add the dry mixture to the food processor and pulse just until combined, ensuring not to overmix.
- Scrape the batter into the prepared pan, smooth into an even layer, and sprinkle dark chocolate chips on top if desired.
- Bake for 20–25 minutes until the edges are set and the center looks slightly soft.
- Let the brownies cool completely in the pan before slicing.